|

Other aspects of
the LOCKSHOP module are listed and linked
in the column to the left.
The Add/Remove Hooks feature
is not unique. This feature is available in almost any Key Management
software. However, there are a number of UNIQUE aspects to the way KeyNET
uses and applies this feature.
Hook Numbers are the location where keys can be located at an
issue point or in the lockshop. They are physical residences for keys when
they are not issue to individuals, placed on a key ring, or flagged as LOST,
STOLEN or RECALLED.
To assign a KeyID to a hook, click on the [Add/Remove Hooks]
link in the left-hand section of the Lockshop Operations screen where the KeyID
is displayed, and the following screen will appear.
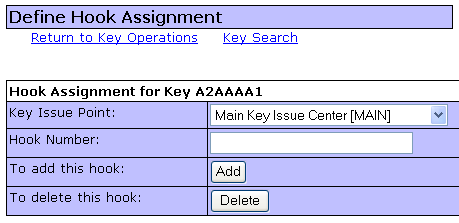
ADDING a HOOK
If you are using MKI, select an issue point where you want the
keys to be stored for issue. If you do not have MKI, this item will not
appear.
-
You can select and type in the Hook Number you want the keys
to be stored on.
-
If you want KeyNET to select the next available HOOK, leave
this field blank, and KeyNET will automatically assign the next available
hook.
-
If you select a Hook which is already in use in the KeyNET
program, the program will give you an error message, and will not assign the
Hook Number.
Then, click on the Add button, and your KeyID will be assigned
to the Hook you have chosen or then next available HOOK, at the Issue Point
indicated.
DELETING a HOOK
When a KeyID and its associated keys are no longer going to
reside on an existing HOOK, it is possible to disassociate the KeyID and the
HOOK.
-
If you are using MKI, select the Issue Point (from the
drop-down list) which you want the KeyID to be removed from its associated
HOOK. Then enter the HOOK number to be disassociated, and click the
[Delete] button. The HOOK number at this MKI Issue Point will be clear
for reassignment.
-
If you are NOT a MKI user, the Issue Point drop-down menu will
not be shown. Enter the HOOK number to be disassociated, and click the
[Delete] button. The HOOK number will be clear for reassignment.
|