|
|
|
|
|
|
|
|
Working with the Customers Database
In the CUSTOMER section of WorkNET you are able to create lists of your customers. The information associated with each customer is customizable; both in name and order of appearance. The number of customers is limited only by your hard drive storage space (so, it is really unlimited). Special features have been added to allow customers to view information about their account. Additionally, customers can add Attach and Store Files in their own area. Each Customer may have any number of fields associated with them. Your Systems Manager can name different types of fields to suit your needs. Thus creating a Custom Customer list for use throughout the program. As your list grows, all of the Customer Names will appear in a DROP-DOWN list in any portion or module of SystemsNET software you have activated. By simply typing in a name for your Customers in the Configuration screen...the Drop-Down list will appear. This is a tremendous time saver. Reducing redundant entries, typing time, typing errors and insuring accurate information input; will insure your ability to perform more accurate searches and reports. When licensed the CUSTOMER link will appear in the top banner.
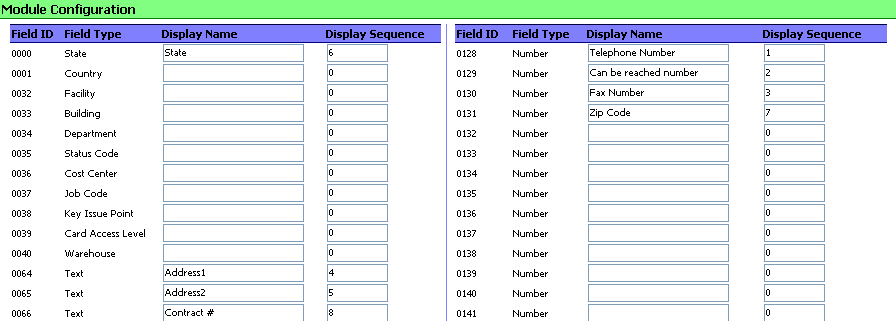
Beneath the Customer link will be the operations available to you in the CUSTOMER module. Systems Managers will see a link to "Configure" and "Privileges". From the Configure link the Systems Manager will be able to customize the fields and the position (display sequence) in which they appear. Here is a sampling of what can be customized:
From the Privileges link the Systems Manger will be able to grant privileges to groups of PEOPLE. Some USERS may NOT be granted access to View Customers, even though the Customer link appears on their screen. While others may be granted the ability to Search, or look for Customers. And others may be able to change the information associated with a Customer without being able to customize the Customers criteria fields. The Systems Manager simply places a check mark in the boxes associated with an Access Group to allow privileges. The "Create" link will allow a USER to add Customers, using the predefined fields created by your Systems Manager. The "Search" link will allow the USER to Search for Customers by a number of criteria. The "%" is a wildcard which will return ALL items in that search field. The entire Customer List can also be exported for external use.
The "List All" link will provide you with a list of ALL of the Customers in your database. Should you desire to customize the information provided, simply copy all of the information to a spreadsheet, and manipulate the information on the spreadsheet.
Spectrum Group has now added the feature which allows users to log in to any
SpectrumNET program to view a summary of their active channel requests. When
this feature is used, an account is created for the customer, and the customer
uses that account to log in to the system. When the customer logs in, the system
recognizes them, and diverts them to a single screen which displays all of the
pending channel requests which belong to that account's customer, in all
eligible channels in the system.
The CUSTOMER module now contains the ability to store files for those who have Customer access to attach files, much like you can attach and store files in "Channel" requests. Access a customer's file area using the FILES link in the light-blue menu bar whenever a customer record is displayed. Each customer has their own private file area and file sequence. Functionality is the same as for channel files, except that the zone default prefix is used, and file status colors are not available. Back to the Top |


|